Monthly Archives: July 2010

Garden Maintenance – Jobs for July

Last week in the garden we did a lot of different maintenance jobs to keep the garden looking good and producing as much as possible. In addition to some heavy weeding, we removed our exhausted first crop of peas and replanted the area, and did lots of staking, harvesting and compost mixing. This gave me the idea to dedicate todays post to those little maintenance jobs that make the difference between a lush, productive garden and a whole bunch of spindly plants going to seed. I’ll break it down into specific plants while also generalizing about crops of that type since many of the practices are the same. For all crops,especially those with bushy growth like squash or bush beans, its extremely important to do a regular cleanup at least once a week. This means going through and removing any yellowing, diseased or dead leaves beneath the plants, as well as any fallen or stunted fruit. I used to believe it was best to leave this foliage to rot  – what could be better than a plant that makes its own compost!?! In reality though, this puts your crops at a serious risk for disease, as fungi and disease that develop on rotting plant matter can easily move to living plants of the same type. So its always best to clean them up regularly, and throw any diseased leaves into the garbage so they aren’t given the chance to grow in your compost.

Carrots: Like most root crops, carrots can and should be continuously planted throughout the season. Reseeding them every two weeks or so ensures that whenever you harvest a bunch of carrots there will be another bunch almost ready to come out, rather than having one carrot crop midsummer and then having to wait another 70+ days for more. This requires a lot of space of course, but if you are a carrot/root veggie lover and will be devoting your garden to them anyway, try to plant in phases.

The most important maintenance you can do with all root crops is thinning. Thin them!! Some gardeners can just understand this and do it as a matter of course. I have always struggled with it, and given my carrots and beets unrealistically tight quarters to grow in. It doesn’t work. You end up with tiny or deformed vegetables, and it makes disease, pest attack and green shoulders (root tops coming above the soil) much more common if you crowd them. You can read seed packages and spacing guidelines or just think: how big does a carrot/beet/radish get? That’s how much space you need to leave them, no less. In addition, make sure to check on your root veggies every week or so and shore up the soil around them so that the roots remain underground; this can be done easily with a handrake or just by hand.

Once you do harvest them, give some consideration to what you’ll plant afterwards. As discussed in last week’s post on crop rotation, root veggies are light feeders, meaning that if you have a healthy soil, they can be followed with a heavy feeding crop such as tomatoes. At this point in the season however, you’ll need something with a shorter season, following with a leafy green (provided the sun isn’t too intense) or a legume plant would be a good idea. You could even follow with another round of root veggie if the soil seems healthy, provided you give it some nutrient building next rotation.

Tomatoes: Two major considerations for tomatoes are pruning and staking. To promote high yields in your tomato plants, it is good practice to remove additional shoots off of the main stem, focusing instead on developing one thick and vigourous central stem. This pushes the plant to focus on producing fruit rather than leaves, adds stability to the plant and increases the chances that all your fruit will ripen by fall. Not having low hanging stems also makes it easier to keep fruit off the ground and prevent disease and pest transmission.

This leads us to staking. Tomato plants come in two varieties: determinate, which grow to a limited size and produce a great deal of tomatoes at once, and indeterminate, which are vining plants and keep growing and producing throughout the season. Both need support, and attention needs to be paid after the installation of supports to make sure the plants are growing properly. Tomato cages are a popular approach, and if a smaller variety is being used and proper pruning being done, they can be successful. The easiest and most effective technique though, tends to be staking and tying the plants, using wooden or bamboo stakes and string, or ideally, the green velcro plant ties that can be re-adjusted as the plant grows and are much less labour intensive than tying strings.

Beans/Peas: Another type of plant that benefits from successive plantings, staggering your planting of both beans and peas can extend your harvest since individual plants are only productive for about a month. The most important thing to keep in mind with these kinds of plants is that they must be picked every few days to keep them productive. If peas and beans are allowed to sit and form large seeds or dry, that sends a signal to the plant that its reproductive work is done and it doesn’t need to keep growing. So be sure to harvest every two to three days, even if you don’t need beans that day, and store them in the fridge.

Raspberries: Staking is key for raspberries and especially blackberries or any kind of mix, such as the tayberries we have in our garden. Staking makes plants easier to pick and easier to care for in future years, by staking first and second year growth in different directions it is easier to recognize the fruiting 2nd year growth from the non-fruiting 1st year. The same system used for tomatoes works for these plants, but another popular technique uses stakes and wires to support the plants with less need for tying. Basically, 6 foot tall stakes are hammered in no more than 20 feet apart, and thick 9 gauge wire strung between them at a height of 3 feet and 5 feet. The berries are guided to support themselves along these wires, and blackberries (unless they are the erect variety which should be trimmed) redirected downwards once they reach the top. More intensive berry production can be accommodated with different styles of trellises, such as a V shape or T shape trellis. See University of Maine extension information here.

Squashes: Squashes also need to be trained, unless you have the space and desire to grow them along the ground. This isn’t a difficult process, especially if you get your trellis in position before planting, the most important thing is simply to keep an eye on the squash (or melon or cucumber) plants and ensure their tendrils are not grabbing anything other than the trellis. Without monitoring they can wrap around their own fruits and stems, or around neighbouring plants, choking them out. Additionally, once fruits begin to form, it’s a good idea to put something under them to separate them from the soil, protecting them from bugs and rot. Bricks, wood, tiles or upside down flowerpots are good props, hanging squash plants can also be supported by tying them to the structure with a sling of pantyhose or other material that supports them like a hammock.

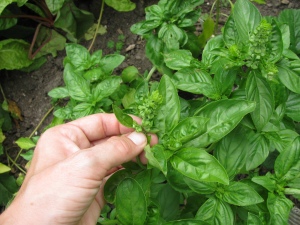
Deadheading Basil

Herbs: Deadheading and resowing are important things to keep in mind with herbs. Certain herbs, such as cilantro and parsley will rapidly go to seed in hot weather. Once the plants begin producing seed, leaf production decreases and the leaves become smaller, less fragrant and less flavourful, in short, not really worth it anymore. The best way to deal with this is just to sow seeds every few weeks, so that when the plants bolt you have more to harvest from, and you can just allow them to make seeds, and then use them to keep reseeding your crop. For other plants, such as basil or mint, they should be constantly and rigorously deadheaded – the flowering tops should be removed, ideally before they bloom. This keeps plants productive and tasty and allows you to control seed distribution; rather than the plants developing and scattering seed wherever and whenever, you decide when it is produced and can save it for the following season.

Leave a comment

Filed under Garden Update, Soil Health

How to grow shiitake mushrooms!

Last week at the garden we went through the preliminary steps of adding a new crop to the garden – mushrooms! Shiitake mushrooms are grown on inoculated logs which can be left outside, making them better suited to our garden than other types of mushrooms, such as oyster, which is usually grown on sawdust or portabello, which needs complete darkness to grow. Shiitake mushrooms are ideal for our garden, because they require dappled light, little care, and are visually pleasing once they start to grow. Overall, it was a pretty easy process, provided you have all the right supplies on hand.

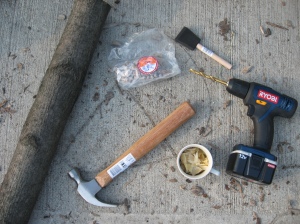
From Left: log, mushroom spore dowels, sponge brush, drill, beeswax, hammer

 Here’s some further detail about each of the materials:

Log – this log should ideally be a hardwood; oak is the wood of choice for shiitake cultivation as it is the most durable wood available, lasting one year for each inch of diameter. Other woods, such as alder, poplar or maple (our choice) can be used as well. The log must be freshly-cut, and less than 3 months old so that there are still sugars present in the wood for the fungi to feed on. The log should be allowed to sit for at least 2 or 3 weeks so that the natural anti-fungal compounds the trees produce can be degraded. The logs should be at least 4 inches in diameter, and 3-4 feet long. Acquiring wood that meets all these criteria can pose a challenge, but the easiest way is to approach companies that cut urban trees, and request some boughs, ensuring the trees are not being cut due to disease. They will likely cut them for you, and provide them for free or a nominal charge.

Mushroom Spore Dowels – These are a mixture of mushroom spores and sawdust which are sold in packages of 100 for around $25. I purchased ours in Montreal, at the world’s only mushroom-only store Mycoboutique, but they can also be purchased in Ontario from Mycosource or Wylie Mycologicals.

Drill – Any drill with a 5/16 inch drill bit can be used

Wax and sponge brush – This is used to seal the holes after drilling to prevent colonization of the log by other pathogens. The wax used must be a food-grade wax such as beeswax or cheese wax. Beeswax can be found easily from honey vendors at farmers’ markets. The sponge brush is an excellent way to apply the wax gradually, but by the end the brush becomes too full of wax to be reused. It’s important that if you’re not doing the inoculation at

Melting Wax

home, that there is a heatsource available for melting the wax. This was a problem for us at the garden, as we didn’t have a kitchen available, so I had to bring the logs home to seal them immediately after inserting the dowels. The wax must be melted above boiling water, if it is heated directly it won’t melt, and if heated long enough, can catch fire!

The process is relatively simple:

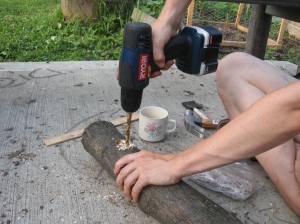
Drilling Holes

Step 1) holes are drilled 1 1/2 inches deep, six inches apart along the length of the logs and two inches apart around the diameter. Using a circular motion with the drill to widen the holes slightly beyond 5/16 inch made the process go much more smoothly.

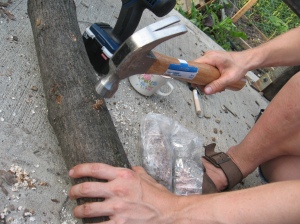
Hammering Dowels

Step 2) dowels are hammered into the holes until level with the bark surface.

Sealing Holes With Wax

Step 3) holes are sealed off with wax to prevent colonization of the log by bad bacteria or other fungi

Step 4) logs are stored upright in the garden in a shady spot, and kept watered and protected from winds. Then the waiting game begins! Unfortunately the logs will not fruit until the following summer, as it takes awhile for the fungi to fully colonize the wood. Once the cut ends of the logs turn black,  you can tell that the wood is ready to fruit. After logs fruit once, they can be “forced” fruit again later in the season. This is done by shocking them: submerging them in ice cold water for 24-48 hours to create an artificial “winter”. One of the most interesting things I’ve read about forcing is that apparently, after shocking the logs, if you bang both ends of them with a hammer it speeds up the fruiting process. This is because it produces vibrations similar to a tree falling nearby, which sends the message to the mushrooms that they need to quickly reproduce to colonize this newly fallen food source! Pretty fascinating stuff.

Thanks to ontariowoodlot.com and fungi perfecti for providing excellent resources which I used to research my own mushroom log project.

Leave a comment

Filed under Garden Update

Crop rotation: or, why can’t I just plant tomatoes in the same spot every year??

As we’re getting into mid summer, some of the early season crops in the garden are coming into the last days of their productivity. Things like lettuce and peas have come to the end of their season and rather than leave those areas of the garden unproductive, we want to remove those plants and put in something else, that way we can grow as much food as possible in our small space. It’s important, however, to put in a new crop that will not deplete the same nutrients as the previous crop. For example, lettuce and spinach are both heavy nitrogen feeders, so it is best not to plant them one after the other. A better solution would be to plant a crop such as beans or peas, which return nitrogen to the soil in between, or to plant a crop that feeds less heavily, to allow the nitrogen to rebuild in the soil through adding compost.  A good crop rotation schedule will see heavy feeders followed by heavy givers, then by light feeders, and back to heavy feeders again. This can be done on a yearly basis for long season crops or throughout the season if you are practicing succession planting (growing more than one crop a year in the same space). A simple guideline to remember is that leafy and fruit crops tend to be heavy feeders, while root crops are lighter feeders. Rotating between these kinds of crops is also important because shallow rooted crops take nutrients from a different level of soil than deeply rooted ones do, and rotation allows both levels the time to rebuild nutrient levels.

Heavy Feeders: swiss chard, broccoli, cauliflower, kale , celery, corn, asparagus, cucumbers, melons, pumpkins, artichoke, lettuce, eggplant, peppers, and tomatoes

Light Feeders: beets, radishes, turnips, carrots, parsley, sweet potatoes, potatoes

Heavy Givers: beans, peas, alfalfa

Nutrient cycling is not the only reason to practice crop rotation. Moving crops around in your garden is also one of the best ways to prevent pest infestation. This is because after feeding on a crop, many pests lay eggs that overwinter in the soil. If the same crop is planted again in that location, the eggs hatch in spring and are presented with the tender leaves of their favourite crop, ready to be devoured! Crop rotation means that pests which overwinter will have to search for their preferred crop in the spring, giving your new plants a chance to establish and reducing the strength of the attack. For this reason it’s important to know the different families to which plants belong (see below). The Colorado Potato beetle will attack potatoes and eggplants, both members of the Nightshade family, so rotating them will not be an effective pest deterrent. Following eggplants with green beans and then carrots, however, would be a much better approach to deter pests, and will fortify the soil at the same time. Crop rotation must of course keep in mind the space and light requirements of each plant, and so certain crops, like sun-loving tomatoes can’t go just anywhere. Just do the best you can, and try to keep the principles of pest reduction and nutrient retention in mind when planning your garden!

Onion Family (Amaryllis Family, Amaryllidaceae): Garlic, onions, leeks, shallots.

Cabbage Family (Brassica, Cruciferae): Broccoli, Brussels sprouts, cabbage, cauliflower, Chinese cabbage, collards, cress, kale, kohlrabi, radishes, turnips.

Lettuce Family (Composite, Daisy Family, Asteraceae): Artichokes, chicory, endive, lettuce.

Beet Family (Goosefoot Family, Chenopodiaceae): Beets, spinach, Swiss chard.

Grass Family (Graminae): Grains–corn, oats, rye, wheat.

Bean Family (Legume, Leguminosae): Beans and peas, clover, vetch.

Tomato Family (Nightshade Family, Solanaceae): Eggplant, peppers, tomatoes, potatoes.

Squash Family (Cucurbitaceae): Cucumbers, melons, summer and winter squash, pumpkins, watermelon.

Carrot Family (Umbellifer Family, Umbelliferae): Carrots, celery, anise, coriander, dill, fennel, parsley.

1 Comment

Filed under Companion Planting, Pest Management, Soil Health

Donating food and tomato troubleshooting

Second Harvest donation


Yesterday was a great day in the garden! We had a huge harvest of lettuces, mesclun greens, green beans, peas, chard, beets, carrots and kale. The harvest was shared this week with Second Harvest, a Toronto-based organization which collects excess fresh food and redistributes it to hungry people and communities. They are a fantastic organization who usually work with bigger quantities of food than we can provide, such as restaurant and grocery surpluses, but have started a partnership with us to distribute half of our garden harvest to groups in need. This is a really exciting development for the garden, and volunteers were very enthusiastic about donating the harvest this week, and it will only get better as our other crops, such as tomatoes and zucchini begin to be ripe for the picking. 

Blossom end rot


There was some bad news in the garden this week however. The first was relatively minor, I neglected to water our upside-down tomato planters all week, which actually led to an instructive experience. One of our developing tomatoes ended up with a case of blossom end rot (pictured at right) which is when a large brown spot develops on the end of your tomato where the flower had been. This is a fairly common tomato disorder, and it is caused when the developing fruits do not get enough calcium. It doesn’t necessarily mean there is a lack of calcium in the soil, however, but rather that the plants haven’t been getting enough water, which is what plants use to move calcium. Without sufficient water they distribute what they can to the leaves, rather than the fruits, in order to maintain photosynthesis, and blossom end rot sets in. If this has happened to your tomatoes, remove the damaged fruits and get consistent with watering and things should be just fine. If not, it could indicate that something else is impairing root function, perhaps damage from rough cultivation, cold soil, or a pH imbalance. 

The second piece of bad news is kind of embarrassing. The fact is, I almost entirely killed our vertical potato planter due to careless application of compost. As you’ll recall, the vertical potato planter works by starting potatoes low in a deep container (such as a garbage can or a composter) and building up the soil around the plants as they grow, to reap a vertical harvest. I have been diligently refilling our compost bin with soil, but my last application was done in a rush at the end of the day, and I threw a large quantity of soil over the potato stalks, righted them, and went home. Turns out you need to add the soil much more gently –  potato plants are not as resilient as I thought and I snapped all but one of the stems! So this allows us a further experiment. I’m going to replant some potatoes at the halfway mark of the barrel this week , and we’ll be able to compare the yield at the end of the season, and also find out if July is too late for planting potatoes!

1 Comment

Filed under Container Gardening, Food Security, Garden Update, Toronto Organizations

Introducing Toronto’s most common garden weeds!

With the heavy rains and powerful sunshine we’ve been getting recently, many of our crops are coming out in full force! Just over the weekend, green beans, peas, zucchinis and cucumbers appeared seemingly from nowhere, and the garden is looking more lush than ever before. At the same time, this is excellent weed growing weather, and even after extensive weeding on Thursdays, the following Wednesday many weeds are threatening to overtake again! As we’ve discussed in previous posts, weeds can actually be very useful, having culinary, medicinal or indicative uses. Today we’re going to look at some weeds found in our garden that are among the most common throughout Toronto and Ontario, and find out how they grow, what they indicate, and if they’re good for anything – besides robbing nutrients from your crops I mean!

Before any post on plants, I have to recognize the Ontario Weeds website again. If you haven’t checked it out yet, you really should, it is an amazing resource that allows you to search through and identify prevalent weeds in this province and find out how they propagate, their lookalikes and non-chemical control options available to manage it.

Redroot Pigweed

Redroot Pigweed

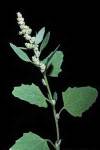
The first weed we’ll be looking at. This plant is identified by alternate leaves on an upright, somewhat hairy stalk which reddens closer to the root. It has long stalked ovate shaped leaves, and develops a bristly bunched flowerhead called a panicle in July and August.

Propagation: by seed only

Roots: fibrous root system from a shallow taproot (one thick, penetrating central root… carrots are taproots, for example)

Uses: In the Amaranth family. Leaves and seeds are edible, historically seeds were ground and used as flour.

Assessment – not the most useful of plants, I pull it out.

Queen Anne's Lace

Queen Anne’s Lace/Wild Carrot

This plant is seen all over Ontario; it has large, round white flowerheads made up of many smaller umbels. It looks very similar to a carrot that has gone to seed, if you’ve ever seen one before, and can get quite tall if left to grow uninterrupted.

Propagation: by seed only

Roots: tough, deeply penetrating fibrous taproot  (again, like a carrot)

Uses: has been used to treat digestive and bladder disorders. Excellent for attracting pollinators such as bees and butterflies.

Assessment: Useful for its pollinator attraction, good surrounding plant beds, but can get out of control

Field Bindweed

Bindweed

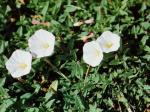
A vining plant with arrowhead shaped leaves and white-pink funnel shaped flowers, bindweed can be quite attractive but very competitive. Its vines can choke out desireable plants and it is a chore to control.

Propagation: by seed and persistent underground root system

Roots: densely spreading whitish root system, which allows new shoots to grow when old ones are pulled.

Uses: said to predict rain- if flowers close during the day, rain should be coming. Has also been used as a laxative and for bile removal.

Assessment: not useful. Try to control by frequent pulling or cutting. Though the plant will come back, if you keep an eye on it, it will not get big enough to harm your crops.

Hairy Nightshade

Hairy Nightshade

An interesting plant, because at first it can look like a tomato, pepper or potato plant as they come from the same family. It can be distinguished from these plants by its teardrop leaves and white star shaped flowers, usually smaller than those on pepper plants, and by the fact that you didn’t plant it, it just appeared!

Propagation: by seed only

Roots: weak root system

Uses: in the same family as deadly nightshade, so best not to consume.

Assessment: pull it before it sets and spreads seeds

Jimsonweed

Jimsonweed

This weed doesn’t actually grow in the garden, but rather in the small crack between the community centre and the concrete path beside it.  If that isn’t a testament to the hardiness of jimsonweed, I don’t know what is! It can be identified by its large, funnel shaped white flower and its dark green serrated leaves.

Propagation: by seed only

Roots: weak roots

Uses: All parts of the jimsonweed plant are toxic, and can be poisonous if consumed in high doses.

Assessment: A nice looking plant in my opinion, and attractant for pollinating moths and hummingbirds, so remove it from garden beds, but you can keep it as a border.

Lamb's Quarters

Lamb’s Quarters

This plant is everywhere in our garden, and one of our volunteers swears by it as a basis for pesto, so we try to keep it around. It has soft, toothy leaves eventually growing a stalk with small, densely grouped white-green flowers.

Propagation: by seed only

Roots: small roots

Uses: young leaves are nutty-tasting and very nutritious, high in vitamin A, C, and calcium and can be eaten steamed or raw. It aids the growth of squash family plants and corn, so is a good addition to three sisters gardens.

Assessment: let it grow, but pull it out before the plants go to seed, and make sure not to put seeds in the composter.

Leave a comment

Filed under Garden Update, Plant ID, Weeds

Jack Johnson and the TGC!

Harvesting Peas

This week in the garden we had another great lettuce harvest, and volunteers took home three different varieties of peas, some for eating fresh and some for cooking. Our swiss chard and kale were also ready to be harvested, we were able to cut a few bunches of each. The garden is entering a phase of needing less work every week, as the plants are all getting well established, the irrigation system is working, and until we harvest more, we’re basically out of room to plant.

Phyllis Picking Peas

Next week at the garden we’ll be hosting a special event to get ready for TGC’s participation in the Jack Johnson Concert on Monday, July 19!  Jack Johnson is an international folk artist whose concert in Toronto will feature TGC, alongside 5 other local non-profits to promote environmental initiatives in the city. As part of his commitment to the environment, Jack Johnson is donating $500 to TGC and will match all donations made until October 15 up to $2,500!

Linda Lifting Lettuce

Come out and see us next Thursday from 4-8, and take a look at how the garden is coming along. And please consider making a donation to TGC, it’s the best time to do so because any money raised will be doubled by a contribution from Jack Johnson’s All at Once organization. Take a look at their website here and check back for TGC’s video which is coming soon. For each complete viewing we receive another $1 donation, so make sure to check it out! Also, you can listedn to Jack Johnson’s newest (and older) albums here.

Leave a comment

Filed under Events, Garden Update

Identifying Garden Pests and Bugs in Ontario

One of the most popular pages on this blog continues to be the Weed identification page posted in May, so I decided it would be a good idea to follow it up with a pest ID post for those of you out there who are finding bugs and bite marks in your garden and wondering who did what.

I’ll start off with the good guys, the bugs we’re happy to have around and want to support. The most famous among these is the ladybug, whose adult form we can all recognize easily: red shell and black spots representing how old they are….or at least that’s what someone told me they meant in elementary school! Some important things to know about ladybugs though are:

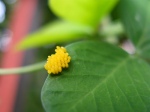
Ladybug Eggs

Their eggs look like this. If you see these eggs on the undersides of leaves, don’t destroy them, and in 2-5 days you’ll find….

Ladybug Larvae

…these guys! Now, even though they look like a troublemaking alligator-insect hybrid they are ladybug larvae, and are even more useful to have around than adult ladybugs because they have a voracious appetite for aphids.

 Attract ladybugs by planting pollen and nectar flowers, dill, dandelion, queen anne’s lace and yarrow are all favourites.

Some more bugs that look like pests but are actually beneficial predators and plants that specially attract some of them:

Soldier Beetle

Soldier Bugs

eat aphids, caterpillars, corn rootworms, grasshopper eggs, beetle larvae

attract with goldenrod, hydrangea, catnip, milkweed and wild parsley

Centipede

Centipedes

eat soil dwelling pests; slugs, worms and fly pupae

Lacewing

Lacewings

eat aphids, thrips, mealybugs, scales, moth eggs, caterpillars and mites

attract with pollen and nectar flowers and flowering weeds

Assassin Bug

Assassin Bugs

eat general pests, flies, mosquitoes, beetles, caterpillars

Now that you’re familiar with some of the beneficial insects in the garden, let’s discuss some more damaging ones. We’ve gone into flea beetles and leafminers  in  previous posts, and some methods to deal with them, though now that we’re further into the season I would definitely say they aren’t worth stressing about, they are an season pest who prey upon young leaves, but as long as the infestation isn’t severe enough to kill your seedlings they’re not worth much concern.

Aphids Everywhere!

Aphids are one of the top garden pests, they’re so small and so annoying and basically suck the life force right out of plants so are the bane of many a gardener’s existence. Luckily all that rage has led to a great deal of knowledge about these pests. They can be dealt with by attracting beneficial insects like those above, and by planting strongly scented deterrents such as anise, basil, chive, catnip, coriander, garlic, stinging nettle or trap crops like yellow nasturtium and sunflowers. If aphid infestation is severe, they can be killed by spraying with a strong, direct stream of water, or managed using a tomato leaf spray.

Imported Cabbageworm!

Imported Cabbageworms are the bane of my personal existence. I spent months in Vancouver picking them and their eggs off of cabbages, broccoli and cauliflower, and it made me determined to get them in their egg state as much as possible. These are the caterpillar form of those white moths you see everywhere in spring and summer, and they love members of the brassica family. They will lay their eggs within the grooves of the leaves and plant heads, and they hatch releasing caterpillars who chew large holes through the leaves. Beneficials are a great way to deal with these pests, and garlic or hot pepper sprays can also help. The best approach is just to be vigilant, however, keeping a close eye on the undersides of brassica leaves, and considering planting red or purple varieties to make the bugs easier to spot.

More pests posts will come soon! In the meanwhile, feel free to ask about any pest damage you’ve encountered, and I’ll try to get to the bottom of it!

2 Comments

Filed under Companion Planting, Pest Management

What is Food Security? New Metcalf Food Solutions published for Ontario

One of the stated purposes of this blog is to discuss Food Security concepts and practices coming out of the city of Toronto. A few previous posts have mentioned food security organizations and events in the city, but I haven’t ever taken the time to describe what it is this term really means.

Food Security is something completely separate from Food Safety, but the two terms are often confused. Food Safety is the domain of Toronto Public Health and deals with not getting e-coli, avoiding botulism, and regulating how food products are processed, stored, and distributed. Food Security, on the other hand, is the domain of the Toronto Food Policy Council (website , facebook) and is assuring that all people in the city have access to sufficient nutritous and culturally appropriate food at all times. While food safety deals with avoiding contamination and disease, food security deals with avoiding hunger and more recently overnutrition, that is the overabundance of processed, food-like products such as Kraft Dinner that are causing increased obesity and diabetes in a great deal of the population.

People interested in increasing food security are generally interested in promoting:

food literacy: knowing  how to prepare nutritious foods in an appetizing way, what foods provide different required nutrients, how foods are grown and how to grow and process them yourself.

urban agriculture: creating food-producing spaces in the city whether through community gardens, backyard sharing, school gardens, rooftop gardens or container/home gardens. Food security organizations and individuals ask how much of the city’s food can be grown within our borders, and what we can do to ensure those who need access to fresh produce can get it.

local food: this term has become the buzzword to end all buzzwords in recent months, which is indicative of a good thing but can lead to confusion. When Food Security supporters discuss local food, they often focus on two primary factors.

1)  that the farmers receive a fair price for their food ( since farmers generally see only 10% of the price you pay for food items), which makes farming a more viable business and keeps families and young people on farms.

2) that the food is also processed locally. As in, those Ontario-grown green beans don’t have to be shipped to the States to be cut and canned, because we return to having the infrastructure to do it here, saving fossil fuels in shipping, and saving the provincial food system at the same time. An important part of Food Security is that Canada and its provinces can feed ourselves as best we can. If the country can’t process and distribute the food its citizens require, then if there is a disruption of the international food provision system we will find we are not very food secure after all.

With this basic outline of food security under your belts, you may want to take a look at some of the five new publications from the Metcalf Foundation, a group which researches and funds initiatives to help Canadians “imagine and build a just, healthy and creative society”. These publications describe innovative and necessary methods to improve Ontario’s food security and long term sustainability. The recommendations include:

food hubs: That is, support facilities for food production. These facilities could offer areas for washing and preparing produce,canning stations and canning supplies, dehydrators, and tool-lending facilities,as well as meeting spaces, experts who could provide advice on technical matters, educational workshops, and a library.

Support of Farmers as environmental stewards: That is, Alternative Land Use Services (ALUS). The program pays farmers for carrying out activities such as planting trees for buffer zones, retiring sensitive land from cultivation, building fences to keep livestock away from watercourses, and practising farming in a way that conserves land and reduces greenhouse gas emissions.

Community Food Centres: Like the Stop in Toronto, CFCs provide emergency food supplies through a food bank, and offer programs to teach healthy eating habits as well as cooking and gardening skills.

The Metcalf Food Solutions propose many more interesting ideas as well, all of which are summed up in Menu 2020: 10 Good Food Ideas for Ontario , though the other articles are also available. Take a look and let us know what food security initiatives you’d like to see as a part of Toronto Green Community.

1 Comment

Filed under Food Security, Toronto Organizations

Identifying and Amending Crop Nutrient Deficencies Organically!

What with the cancellation and rescheduling of our workbees for the past two weeks, the garden hasn’t had a great deal of attention lately, but for  the most part crops have been flourishing with the hot weather and consistent rainfall. We harvested several heads of lettuce and bagfuls of mesclun mix last week, along with a variety of bunched radishes. New hot peppers and tomato plants were put in the sunny patch where the lettuce had been, a plot that may have been overly sunny for our lettuce as some of it began to bolt by the time we were able to harvest it. 

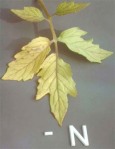
One are of the garden that has been suffering has unfortunately been our original tomato, pepper and eggplant bed. The plants in this bed have remained smaller than the rest despite receiving a great deal of sunlight hours, and this week we noticed the leaves had begun to take on a yellow hue, a sure sign of nitrogen deficiency. In addition, some of our pepper plants had purple tinged stems as well, which indicates a phosphorus deficiency. We decided that our initial addition of compost to the bed had been incomplete, and had not sufficiently covered this patch, which would explain the growth problems – the soil was lacking nutrients. In an effort to amend the soil we applied compost around the base of all our plants and watered them with a mixture of water and worm compost leachate  in a ratio of about 10:1. Although there is a great deal of debate regarding whether or not worm leachate is beneficial or damaging to plants, we decided that as the worms are not consuming anything toxic and the leachate is completely odourless, it is highly unlikely that its addition can do any damage. I will update next week with a progress report on the plants, and we’ll see whether we need to take further steps. 

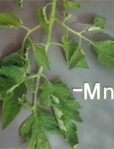
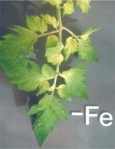
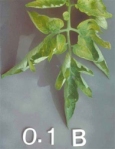
Nutrient Deficiency Symptoms

This made me want to look into nutrient deficiency symptoms in plants further, and provide you with some indicators and organic amendments for these problems. I have touched on this topic before in the gardening handouts post, but here’s a refresher thanks to Rodale’s Vegetable Garden Problem Solver. I want to emphasize that most of these problems can be prevented by adding sufficient well decomposed compost at the beginning of and throughout the growing season. Using compost when you are able is always a better option than adding fertilizers, even if they are organic they are still external inputs and the goal in organic gardening is to grow as close to zero-input as possible. A great page that goes into much further detail about nutrient deficiency is Golden Harvest Organics here.

Nutrient Lacking Symptoms Organic Amendments
Nitrogen Spindly or stunted growth; lower leaves pale green, then turn yellow Alfalfa meal, blood meal, cottonseed meal (lowers soil pH), feather meal, fish emulsion/meal, guano, soybean meal (make sure it’s not GMO), composted coffee grounds
Phosporus Lower leaves and stems look reddish or purplish; young leaves pale; plants don’t flower or form fruits Bonemeal, rock phosphate (slow acting, apply a season ahead), soybean meal (make sure it’s not GMO), guano
Potassium Lower leaves mottled or curled; edges of leaves turn brown and dry; weak stems; small root systems Greensand(may lower soil pH), Kelp (seaweed), wood ashes(will raise soil pH significantly), guano
Calcium Growing tips die back; tips of new leaves appear scorched; leaves are abnormally dark green; weak stems; blossom end rot of fruits Gypsum(lowers soil pH), crushed eggshells, dolomitic limestone, calcitic limestone
Magnesium Lower leaves mottled yellow or show white patches; leaves turn reddish purple Epsom salts (dissolved in water), dolomitic limestone
Iron Young leaves turn yellow but veins remain green Bone or blood meal
Zinc Young leaves mottled yellow; plant tips top growing; plants wilt easily Increase soil acidity; zinc chelates
Boron Leaves curl under; heart rot Diluted borax

images thanks to progressivegardens.com

1 Comment

Filed under Composting, Garden Update, Soil Health